

Host Multiple Django WSGI Sites with OpenLiteSpeed VHost Templates
In this tutorial, we are going to make a VHost Template which will be able to host many Django WSGI application with a single configuration file in our OpenLiteSpeed environment.
Instead of creating many standalone virtual host instance, this template will serve as a centralized configuration to each of its member site (a.k.a hosts).
Prerequisite
- Working OpenLiteSpeed (+1.7.14 beta) instance running on your server
- Python3 with virtualenv installed to separate each site’s environment
- Each of your Django project must be placed in its own document root named after the domain host it will use (ie: /var/www/django-site.com/djangoproject)
- Each of these sites must have its corresponding virtualenv created, with also the same name as its host! (ie: ~/.virtualenvs/django-site.com)
It’s important to name the document root and virtualenv after its domain because currently that’s the only way to dynamically configure these hosts through a VHost Template.
Install WSGI
First we need to download and compile wsgi-lsapi and paste it under /usr/local/lsws/fcgi-bin/.
curl -O http://www.litespeedtech.com/packages/lsapi/wsgi-lsapi-1.9.tgz
tar xf wsgi-lsapi-1.9.tgz
cd wsgi-lsapi-1.9
python3 ./configure.py
make
cp lswsgi /usr/local/lsws/fcgi-bin/
Source: https://openlitespeed.org/kb/python-wsgi-applications/
Server configuration’s Python settings
It’s useful to setup some base things in our OpenLiteSpeed’s default python settings to speed things up.
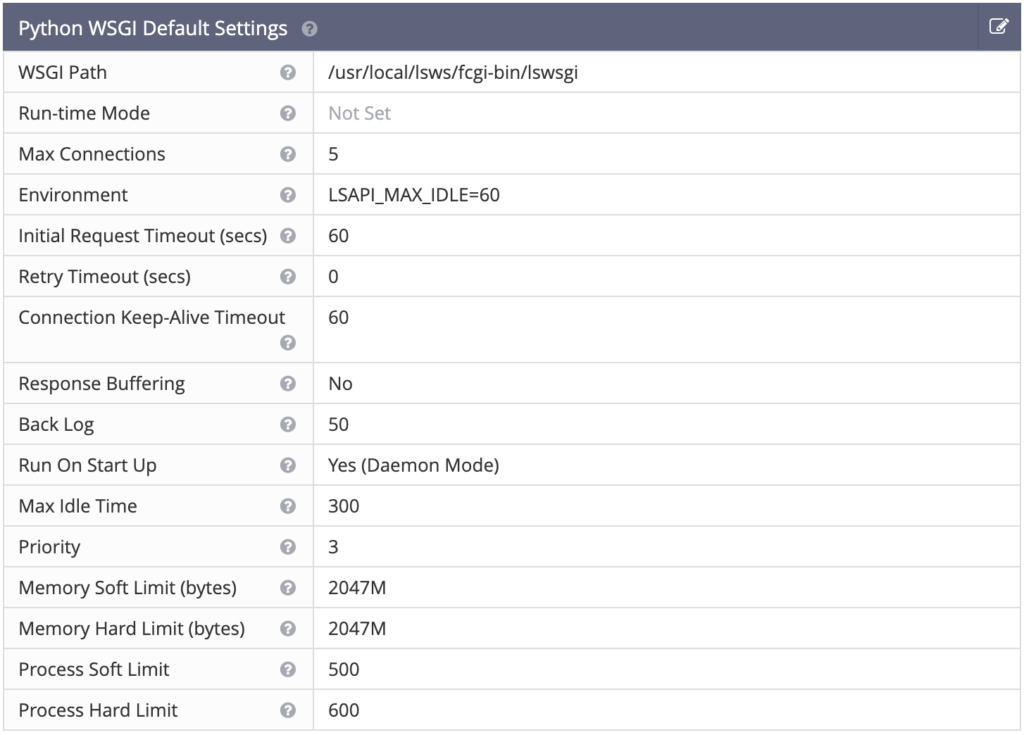
Let’s go over to OpenLiteSpeed admin panel. Choose Server Configuration on the left, then App Server tab, then scroll to Python WSGI Default Settings box and hit edit.
Set WSGI path pointing to the file we just placed right before.
WSGI Path: /usr/local/lsws/fcgi-bin/lswsgi
Python WSGI comes with detached mode by default. This means that LiteSpeed server and lswsgi processes are completely separated. So even if you tweak something in your vhost configuration and you hit the graceful restart button, you probably won’t see any changes until you kill all lswsgi processes as well.
Also, if you make any changes in your source code you also have to kill these processes by hand.
killall lswsgi
Luckily, this behaviour can be easily changed.
Scroll to Run On Start Up and change it to Yes (Daemon Mode).
Run On Start Up: Yes (Daemon Mode)
Now every time you make a graceful restart, your changes will take effect immediately.
Creating a Django VHost Template
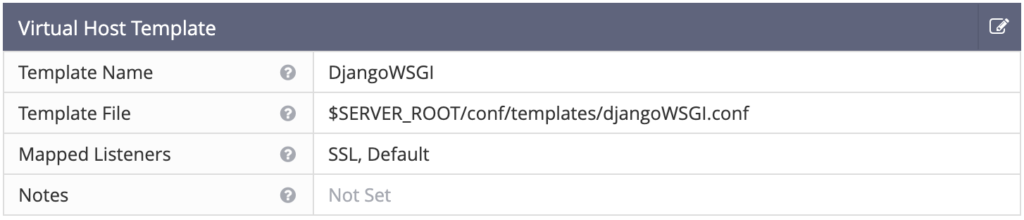
Go over to VHost Templates page and hit the add button.
Give a name for this template – mine just DjangoWSGI – set the path to the config file and the Mapped listeners by a comma separated list.
You probably want to store your template file in your LiteSpeed web server’s default config folder.
$SERVER_ROOT/conf/templates/djangoWSGI.conf
For the mapped listeners you may need to check your listeners proper name. Mine is “SSL, Default” with SSL secured on port *:443 and Default running port *:80.
Template Name: DjangoWSGI
Template File: $SERVER_ROOT/conf/templates/djangoWSGI.conf
Mapped Listeners: SSL, Default
General
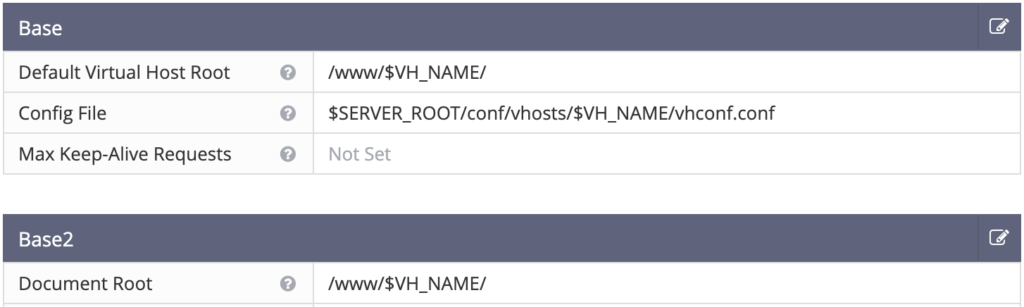
Base
Default Virtual Host Root: /var/www/$VH_NAME/
Config File: $SERVER_ROOT/conf/vhosts/$VH_NAME/vhconf.conf
Base2
Document Root: /var/www/$VH_NAME/
Make sure you set the right path to your site’s root. $VH_NAME will be replaced with your site’s domain after all.
Some of you may better like to separate the Virtual Host Root from your Document Root but I just like the simplicity that they are the same folder.
In case you use a different path for each field you have to make sure they both exists or your virtual host just wont launch.
Log
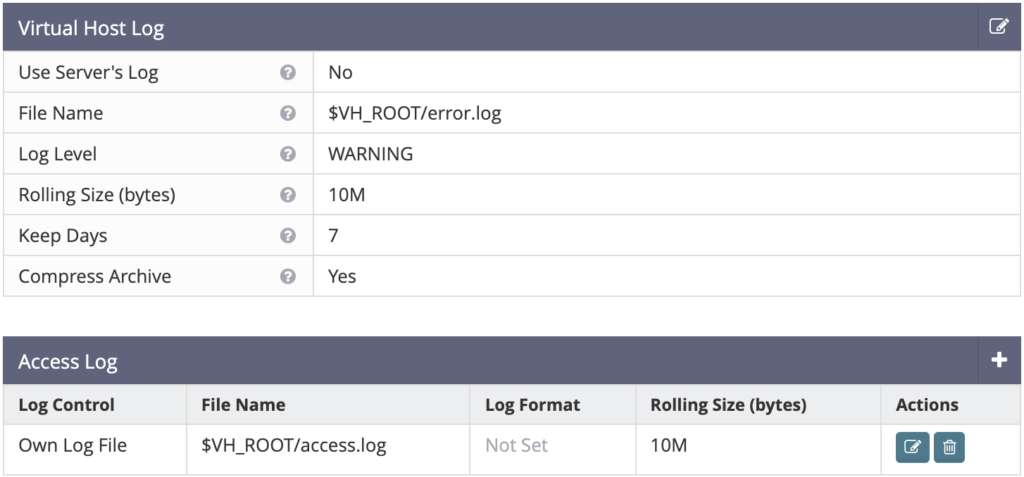
You may want to log into each hosts own log file, so you should set them.
I like them logging into the following locations:
$VH_ROOT/error.log
$VH_ROOT/access.log
So they will be available under /var/www/django-site.com/*.log.
I encourage you to set it’s own access and error log with some 10M rolling size and compressed. You can set keep days to something like 7 or so.
However I never saw python errors logged into error.log, they always written for me into stderr.log which could not be set up on this page but it will be created under $VH_ROOT as well.
Security
File Access Control

Follow Symbolic Link: Yes
Enable Scripts/ExtApps: Yes
Restrained: Yes
External App Security

External App Set UID Mode: DocRoot UID
You may want a separated user owning your Django’s document root. By setting UID Mode to DocRoot the lswsgi processes will run by the same user as the document root owner and its content will be writable as well.
SSL
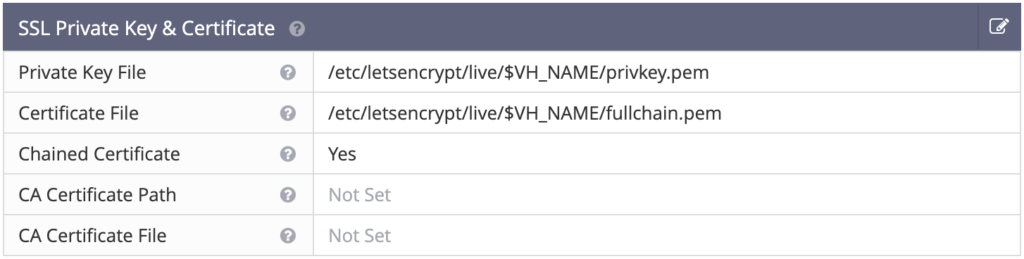
You may want set your proper certification and key path. In case of Let’s Encrypt you might want to set something like this:
SSL Private Key & Certificate
 Private Key File: /etc/letsencrypt/live/$VH_NAME/privkey.pem
 Certificate File: /etc/letsencrypt/live/$VH_NAME/fullchain.pem
 Chained Certificate: Yes
Context
Now, this is where the magic will happen.
We have to add a new context. Click on the add button and choose App Server.
App Server Context
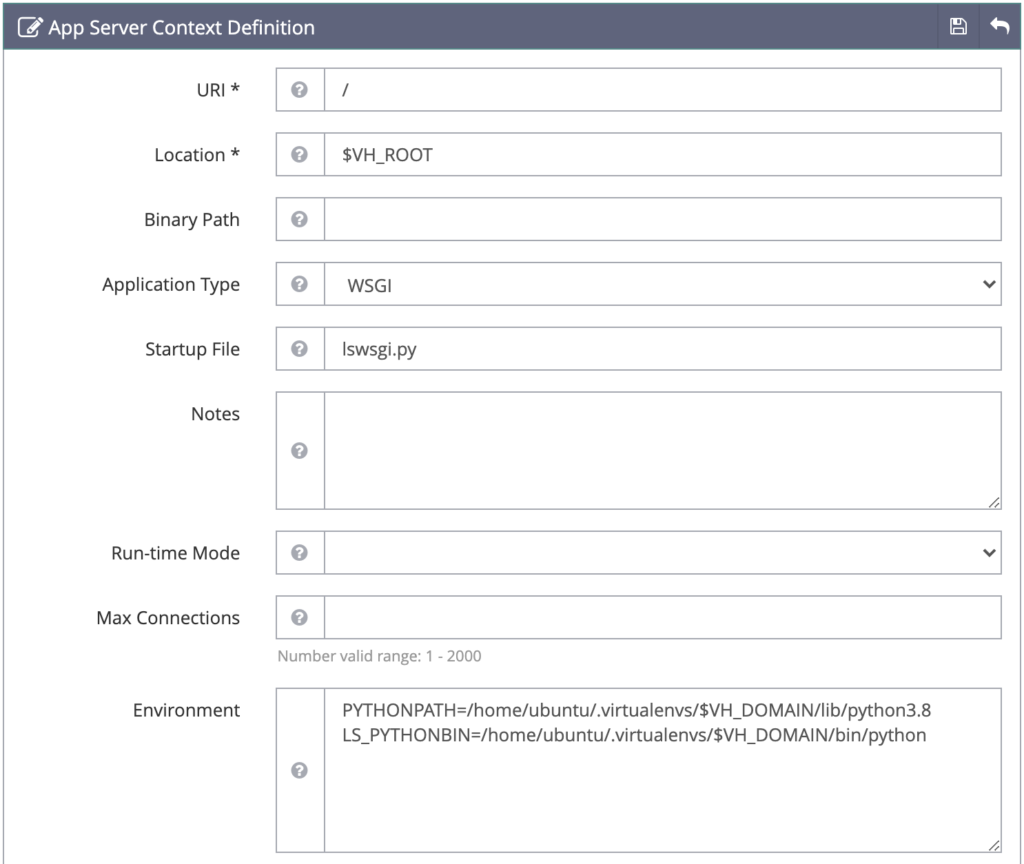
URI*: /
Location*: $VH_ROOT
Application Type: WSGI
Startup File: lswsgi.py
If you need different lswsgi version handling this template, you can set it in Binary Path field. Otherwise, it will just use the default one we first set in Python WSGI Default Settings’ WSGI Path.
Environment
This is where things become neat. We will set our Python paths and binary dynamically by setting its corresponding virtualenv.
PYTHONPATH=/home/ubuntu/.virtualenvs/$VH_DOMAIN/lib/python3.8
LS_PYTHONBIN=/home/ubuntu/.virtualenvs/$VH_DOMAIN/bin/python
Remember the last point of prerequisites?
Each of your django website should have it’s own virtualenv named after its domain host.
Please set these absolute paths and the correct Python version, according to your virtualenv settings.
You might get things prettier if you set your PYTHONPATH=/home/ubuntu/.virtualenvs/$VH_DOMAIN/lib/python instead of directly pointing it to python3.8 like me, but that of course also requires you to create a symbolic link to the specific version.
Every other settings can stay on default. You can save this box for now and let’s go back to Context page.
In case your VHost variables are not getting replaced you may need to install the latest beta of OpenLiteSpeed as it stated in this GitHub issue.
Static Contexts
You may can skip the rest if you serve your static files from different server like S3, but you may need this if you need to pass the acme challange by Let’s Encrypt and make the .well-known folder accessible.
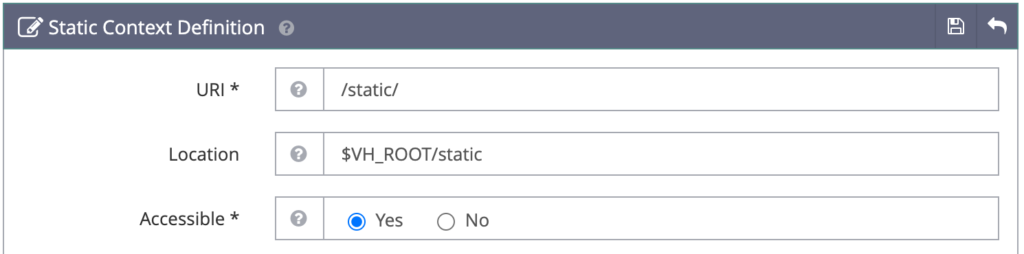
Static
Now we have to make sure our static files handled correctly by the server.
For this we have to add another Context, but this time we will add a Static handler. Hit the add button and choose Static.
You need to set the following and then Save.
URI*: /static/
Location: $VH_ROOT/static
Accessible*: Yes
Media
Now roll back to Context page and do exactly the same for media files as well.
URI*: /media/
Location: $VH_ROOT/media
Accessible*: Yes
Wait a minute, isn’t Django hold its static and media folder right under it’s project folder?
That’s right, the most common pattern for both static and media root is not the same as $VH_ROOT.
You probably have the following hierarchy.
/django-site.com  > this is your $VH_ROOT
|_/django_project > this is your django project
|__/django_app    > one of your apps
|___/static       > static root
|___/media        > media root
So you might can catch that the location field of Static and Media context not matching the regular settings of a Django project.
The problem here is that we do not have access to our django project name through this VHost Template, so we need a little trick here.
You have two options. You can either tweak your STATIC_ROOT and MEDIA_ROOT in your django settings, so it’s placed right under your virtual host root, or you can simply create two symbolic links pointing to the correct directories.
I’ve just chosen the later one. I like the things how I get used to it and creating two links is not a big deal.
cd django-site.com
ln -s django_project/static ./static
ln -s django_project/media ./media
Favicon and .well-known
I have a favicon.ico and .well-known static handler as well. It’s up to you what you need.
You may need a .well-known static context if you plan to use Let’s Encrypt SSL certification and you need to pass the acme challange.
Order the Context
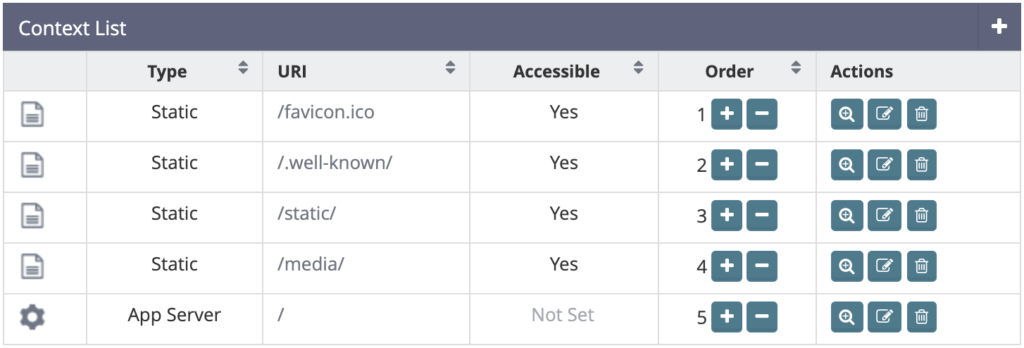
Now let’s go back to the Context page and set the order with the minus and plus buttons. Put all the static contexts first and the WSGI App Server lastly. Manage the static contexts priority in the order you want these rules to be applied, just like in an old fashioned .htaccess file.
Deploy a Django app
We are ready to deploy our first Django app in this VHost Template.
Navigate to the directory you store your websites and clone your project into the proper folder.
cd /var/www
mkdir django-site.com
git clone django_project ./django-site.com
We also have to create our corresponding virtualenv with the same name as the wrapper folder and of course install our dependencies.
mkvirtualenv django-site.com
pip install -r ./django-site.com/requirements.txt
I assume you use a database and you know how to prepare one for yourself, just as well how to migrate it.
We are almost done. We need one more file in order to make this website work and that is lswsgi.py.
This will be launcher of our WSGI app, pretty similar to the wsgi.py file that Django creates for you when you start a project.
The necessity of this file is that we want to standardize the whole WSGI hosting process but OpenLiteSpeed just cannot access our Django App’s project name. So we will create wrapper file instead.
nano ./django-site.com/lswsgi.py
Paste this content.
# lswsgi launcher
import os, sys

PROJECT = 'django_project' # replace to your project name
DJANGO_SETTINGS = f'{PROJECT}.settings'

HOME = os.environ["HOME"]

PROJECT_PATH = f'{HOME}{PROJECT}'

# adding required paths
sys.path.insert(0, PROJECT_PATH)

# now we can safely load our django app
from django.core.wsgi import get_wsgi_application

os.environ.setdefault('DJANGO_SETTINGS_MODULE', DJANGO_SETTINGS)

application = get_wsgi_application()
The last thing we need to do is to add this virtual host as a member of this VHost Template.
Member Virtual Hosts
Go to the Template tab and hit the add button on the Member Virtual Hosts panel.
Add your domain in the Virtual Host Name field and save.
Virtual Host Name*: django-site.com
Congratulations, it’s all done!
Make a graceful restart on the OpenLiteSpeed admin panel and load your website.
You should see your working Django site.
Every time you need to deploy another Django App you just have to repeat the previous two chapters.
Logging
In case of 500 error you may need to enable DEBUG in your Django settings to get more hints about the problem or you should properly configure your logging settings.
# place this in your django settings and it will log errors
# into stderr.log even if DEBUG is False
LOGGING = {
    "version": 1,
    "disable_existing_loggers": False,
    "handlers": {
        "console": {
            "class": "logging.StreamHandler",
        },
    },
    "loggers": {
        "django": {"handlers": ["console"], "level": "INFO"},
    },
}
Conclusion
There are several things that could be improved but overall I’m satisfied with OpenLiteSpeed. Their VHost Templates are one of the best thing I used in between traditional web server solutions and premium webhosting tools.
LiteSpeed server’s performance just outstanding compare to its competitors and hand in hand with OpenLiteSpeed’s interface is a very powerful weapon.
According to WSGI hosting, things could be improved if we could set
- unique Environment variables
- project or app name
- different python versions
for each of our member hosts.
You may think at this point that project name can be set through the Virtual Host Name field but there are several problems with that. One of them is that member name has to be unique and you may want to deploy several instances of the same project under different hosts. Another problem is that $VH_NAME variable must be used when setting Virtual Host Root. Not sure why is that but OpenLiteSpeed developers decided this way,
That’s all for this tutorial. Hope it’s all clear and good, I’m glad to hear your feedbacks.